
Introduction
Are you a driven urban professional in your 40s, squeezing self-care into a packed schedule amid a compact city apartment or maybe you didn’t even know infrared saunas existed until you saw a picture scrolling on your phone and ended up here looking for more information.
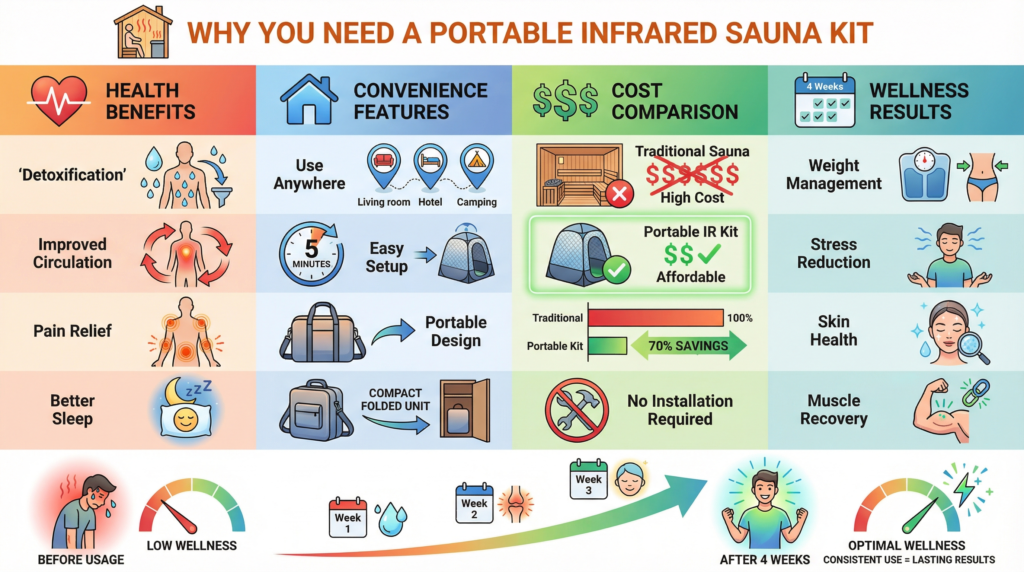
Whatever drew you here, the allure of infrared therapy—promising muscle recovery, detox, and stress relief without leaving home—draws you in, but traditional saunas demand space and setup you can’t commit to.
Enter portable infrared sauna kits: compact, easy-to-store solutions that heat your body directly for therapeutic benefits at lower temperatures. Problem is which one is best for you?
This guide equips you with everything to choose wisely, addressing pain points like inconsistent heat and EMF confusion. We’ll cover basics, key factors, a step-by-step process, tips, mistakes, and more to ensure your pick enhances wellness without regrets.
By the end, you’ll know if models fit your lifestyle.
Or Continue Reading
Table of Contents
Disclosure: These tools includes affiliate links. If you make a purchase via these links, we might receive a commission, which doesn’t affect your cost. We appreciate your support!
Understanding the Basics
Portable infrared sauna kits use light waves to warm your body, not the air, reaching deeper tissues for perks like improved circulation and pain reduction.
Unlike traditional steam saunas, they operate at 110-170°F, making sessions gentler and more accessible for beginners or those with mobility issues.
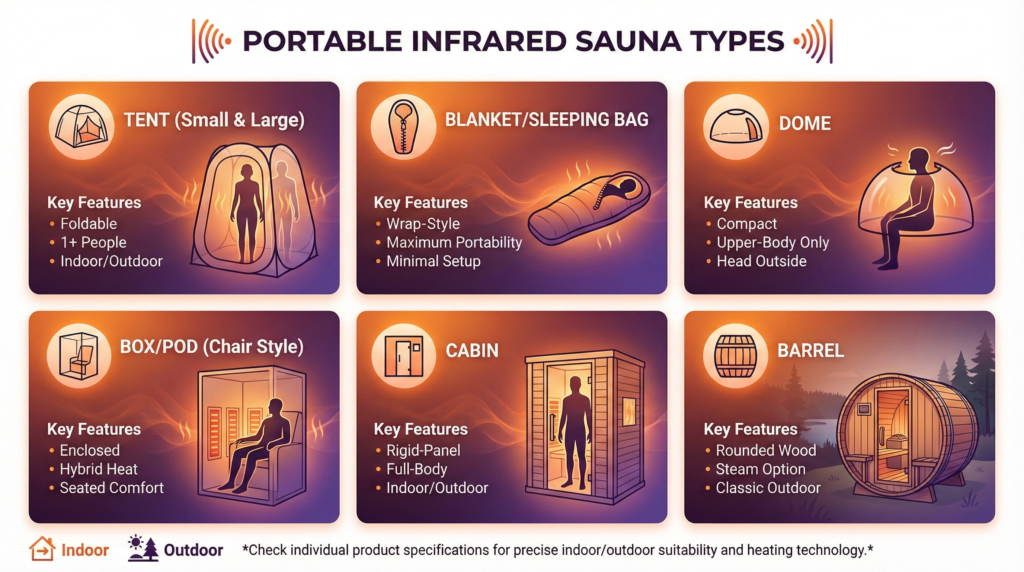
Portable Infrared Sauna Types include
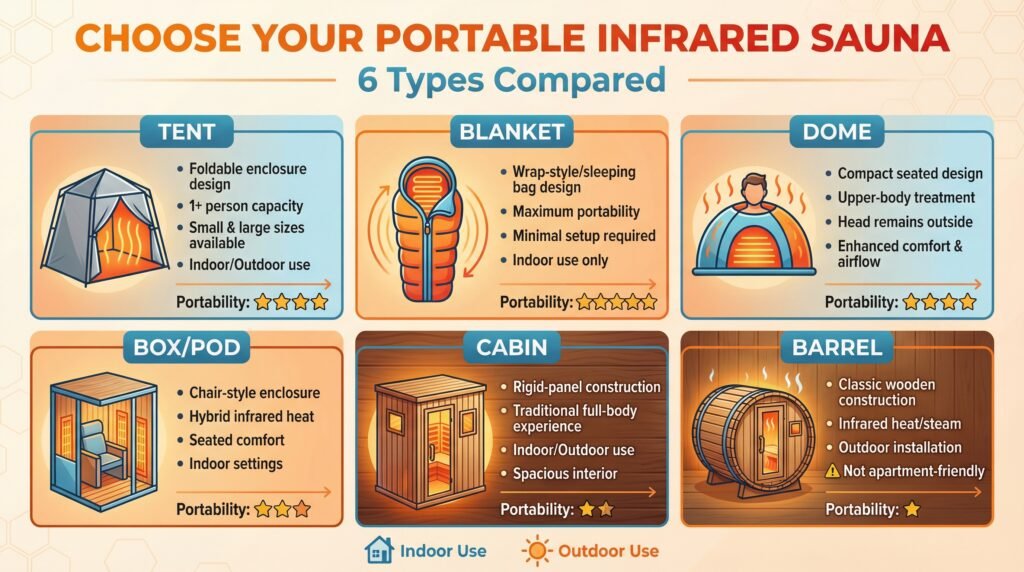
- Tent – Portable foldable enclosures for one or more people that use infrared and can be used indoors or outdoors. These come in small and large sizes.
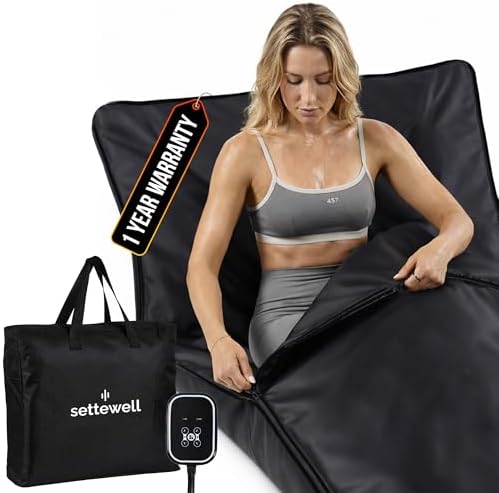
- Blankets – Portable infrared wrap-style saunas designed for indoor use that maximize portability and require minimal setup. Also referred to as a portable infrared sleeping bag or full body bag.
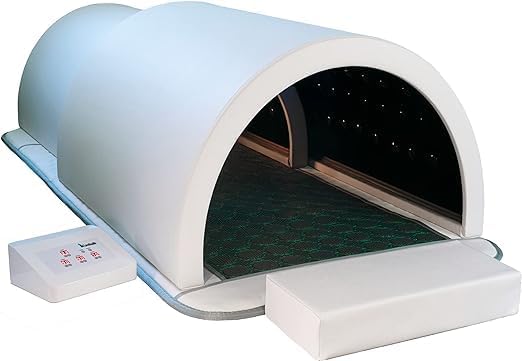
- Dome – Portable compact infrared saunas that allow seated, upper-body sessions while keeping the head outside for comfort and airflow.
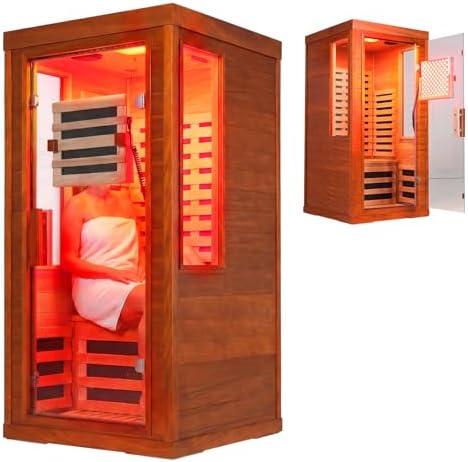
- Box / Pod (Chair Style) – Portable seated, enclosed saunas using hybrid infrared heat, offering comfort and ease of use for indoor settings.
- Cabin – Portable rigid-panel saunas using infrared heat that provide a traditional full-body experience indoors or outdoors.
- Outdoor Barrel / Cabins – Portable rounded wooden saunas using infrared heat/steam, typically installed outdoors for a classic sauna environment. Usually not suitable for apartment dwellers.
Key components: Heaters (carbon or ceramic for even distribution), controls (timers, remotes), and materials (water-resistant fabrics or woods). For apartments, prioritize plug-in models on 120V outlets to skip electrician costs.

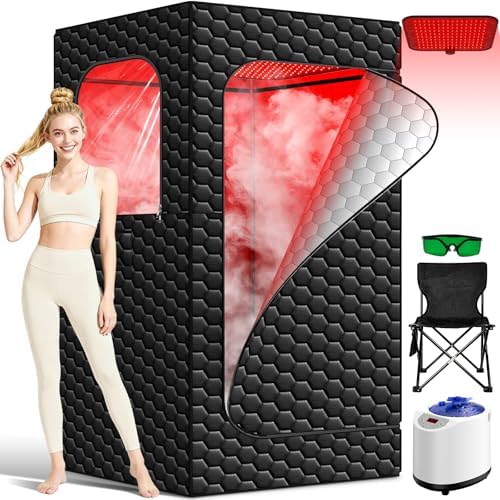
- 【Your Personal At-Home Wellness Retreat】 Unwind after a long workday with your private portable sauna, complete with foo…
- 【Far Infrared Sauna: Safe, Efficient & Easy to Maintain】 Equipped with 3 carbon crystal heating panels and 1 LED warm li…
- 【SAFE AND SECURE】 Easily adjust temperature via the control panel to match your comfort needs. Built-in automatic timer …

- Experience Shared Comfort in Spacious Luxury: This 2 person sauna offers generous dimensions of 71″ x 49″ x 36″, providi…
- Dual Sauna Steamer, Ultimate Relaxation: Powered by dual 1400W/3L sauna steamers, our infrared sauna system delivers rap…
- Steam Sauna with 660nm + 850nm Red Light: Unlike traditional saunas, This infrared steam sauna combines the power of 660…
- 【MORE LED BEADS, HIGHER EFFICIENCY!】Experience advanced skin care with professional-grade 160 LEDs red light therapy pan…
- 【1200W RAPID HEATING & 3L STEAMER】It is not only an infrared dry sauna, but also a steam sauna with a steam generator. A…
- 【SPACIOUS SPACE & COMFORTABLE DESIGN FOR ALL USERS】Generous size 32″ x 32″ x 71″ of personal sauna box, a folding chair …
Key Considerations
Selecting the right portable Infrared sauna kit hinges on several factors tailored to your needs.
Size and Portability
Measure your space: Blankets need a flat surface (6×3 feet); tents fit 3×3 feet setups. Weight matters—under 20 lbs for easy storage. Renters love collapsible designs avoiding permanent changes.
Heating Technology
Far-infrared penetrates deeply for detox; full-spectrum adds near/mid for skin and wound healing. Avoid weak heaters in cheap kits causing uneven temps—aim for 1,000-1,500 watts.
Infrared vs. Traditional Heat: Why It Matters
Understanding the heating mechanism clarifies why infrared saunas feel and function differently than traditional options:
Why infrared dominates portable market: Lower operating temperatures, faster heat-up times, and dry heat make infrared ideal for space-constrained environments and portable designs. Traditional saunas require substantial insulation and higher power consumption better suited to permanent installations.
The Three Types of Infrared Technology

Not all infrared heaters deliver identical therapeutic effects. Understanding wavelength differences helps match technology to goals:
Near-infrared (NIR):
- Wavelength: 0.7-1.4 microns
- Penetration: Shallow (skin surface to ~2mm)
- Primary benefits: Skin health, wound healing, anti-aging
- Typical use: Targeted therapy panels, facial treatments
- Cost premium: Highest
Mid-infrared (MIR):
- Wavelength: 1.4-3 microns
- Penetration: Medium (2-10mm into tissue)
- Primary benefits: Improved circulation, muscle relaxation
- Typical use: Combination panels with far-infrared
- Cost premium: Medium
Far-infrared (FIR):
- Wavelength: 3-1,000 microns
- Penetration: Deepest (tissue depths up to 40mm)
- Primary benefits: Core body heating, detoxification, deep muscle therapy
- Typical use: Most common in portable saunas
- Cost premium: Standard/lowest
Most portable infrared sauna kits use far-infrared (FIR) technology as the primary or exclusive heating source due to manufacturing cost and therapeutic versatility. Premium models may incorporate multi-spectrum panels combining all three wavelengths.
EMF Safety
Confusion abounds—look for <3mG levels with third-party tests. Budget kits may hit 100mG, risking fatigue; premium like Therasage stay ultra-low. Use a meter for verification.
Energy Efficiency and Cost
Kits use $0.20-0.50 per session; efficient carbon heaters save more. Upfront: $200-2,000; factor warranties (1-5 years).
Additional Features
Chromotherapy lights, Bluetooth, app controls enhance experience. For pain, add red light therapy.

- THE SAUNA DOME: A perfect far infrared sauna for those who want to save time and create a more comfortable sauna session…
- RAPID PREHEAT TIME: Enjoy a perfect sauna session with only a 5-10 minute preheat. Traditional saunas may take upwards o…
- HIGHEST MAXIMUM TEMPERATURE: We built our saunas with your needs in mind. Maximum temperature of 194°F. Far infrared is …
- NEAR-ZERO EMF SAFETY DESIGN: Engineered to minimize electromagnetic exposure while delivering effective infrared heat, e…
- POWERFUL 1300W HEATING PERFORMANCE: Provides consistent, deep-penetrating heat for full-body relaxation, helping to ease…
- JADE STONE HEAT: Integrated jade stones distribute gentle, even warmth that enhances relaxation and promotes soothing re…
- FOR EVERYBODY: The XL Is Bigger! Made For Larger Lovely Humans, And People Who Need To Wiggle. The Premium XL has more s…
- THE SAUNA DOME: A perfect far infrared sauna for those who want to save time and create a more comfortable sauna session…
- RAPID PREHEAT TIME: You can enjoy the amazing benefits of a sauna with as little preheat time as 5-10 minutes. The days …
Which Portable Infrared Sauna Kit is Best for your situation? => Portable Infrared Sauna Quiz
Step-by-Step Guide: How to Choose Your Portable Infrared Sauna Kit
Follow this systematic decision framework to identify the optimal unit for your specific situation.
Step 1: Define Your Primary Use Case
Different wellness goals require different sauna characteristics. Identify your priority:
Muscle recovery and athletic performance:
- Need: Deep tissue heat penetration
- Optimal choice: Cabin-style with multiple wall panels
- Temperature requirement: 140-150°F capability
- Session duration: 30-45 minutes
- Frequency: 4-6 times weekly
Chronic pain management:
- Session duration: 25-40 minutes
- Need: Consistent, full-body heat coverage
- Optimal choice: Box/Pod/Cabin-style with 6+ panels including back coverage
- Temperature requirement: 135-145°F sustained
- Frequency: 3-5 times weekly
Relaxation and stress relief:
- Need: Comfortable, calming environment
- Optimal choice: Tent/Pod, Blanket, Box, Dome based on space/budget
- Temperature requirement: 120-135°F (lower heat acceptable)
- Session duration: 20-30 minutes
- Frequency: 2-4 times weekly
Skin health and detoxification:
- Need: Sustained sweating at comfortable temperatures
- Optimal choice: Tent/Pod/Box/Dome with good insulation
- Temperature requirement: 130-140°F consistent
- Session duration: 30-45 minutes
- Frequency: 3-4 times weekly
Testing/exploring sauna therapy:
- Need: Low-risk entry point, space saving design,
- Optimal choice: Budget tent-style, Blanket, Dome, Box/Pod or Entry Cabin
- Temperature requirement: Any reaching 130°F+
- Session duration: 15-25 minutes initially
- Frequency: 1-3 times weekly
Step 2: Measure Your Available Space
Complete this space assessment worksheet:
Primary setup location: ___________________
Dimensions:
- Length: ___ inches / ___ feet
- Width: ___ inches / ___ feet
- Height/clearance: ___ inches
Electrical:
- Outlet within 6 feet: Yes / No
- GFCI protected: Yes / No / Unknown
- Outlet dedicated or shared circuit: ___________
Ventilation:
- Window present: Yes / No
- Exhaust fan: Yes / No
- Natural air circulation: Good / Fair / Poor
Storage (if not leaving assembled):
- Storage location: ___________________
- Storage space dimensions: ___ × ___ × ___
- Easy access: Yes / No
Compatibility check:
Compare your measurements to sauna categories:
- Tent-style needs: 10-12 sq ft assembled, closet storage
- Single cabin needs: 12-18 sq ft assembled, under-bed or large closet storage
- Two-person cabin needs: 25-35 sq ft assembled, dedicated storage area
Space is insufficient? Consider sauna blanket alternative or postpone purchase until living situation changes.
Step 3: Set Your Budget Parameters
Determine maximum investment across three categories:
Initial purchase budget: $___________
Comfort range: This is the amount you can spend without financial stress or second-guessing.
Monthly operating budget: $___________
Electricity addition acceptable: This impacts total cost of ownership and session frequency sustainability.
Emergency repair budget: $___________
Unexpected replacement: Set aside 10-15% of purchase price for potential repairs/replacements in first 2 years.
Budget reality check:
| Your Budget | Realistic Options | Limitations to Accept |
|---|---|---|
| Under $300 | Budget tent-style, blanket, pod | Higher EMF, less coverage, shorter lifespan |
| $300+ | Mid-tier tent, box, pod, dome | Quality, acceptable performance |
| $1000+ | Quality tent, cabin, blanket, dome with good features | Solid long-term investment |
| $5,000+ | Premium cabin with low-EMF | Best performance and durability |
Step 4: Prioritize Your Non-Negotiable Features
Identify your top 3-5 must-have features from this list:
Performance features:
- Maximum temperature ≥145°F
- Heat-up time ≤30 minutes
- Upper body/shoulder heat coverage
- Temperature stability ±5°F or better
Safety and health:
- EMF levels ≤3.0 mG verified
- Certified by UL, ETL, or CE
- Auto-shutoff safety timer
- Overheat protection
Convenience:
- Setup time ≤10 minutes
- Compact storage (under-bed size)
- Digital temperature control
- Remote control outside unit
Durability:
- Warranty ≥2 years
- Canadian hemlock or cedar wood
- Commercial-grade tent fabric
- User reviews confirming 3+ year lifespan
Budget:
- Total cost ≤$500
- Monthly operating cost ≤$25
- Replacement parts readily available
Your top 3 non-negotiables:
These become your primary filtering criteria when comparing models.
Step 5: Research and Compare Specific Models
With criteria established, begin systematic model comparison.
Research checklist for each candidate model:
- Manufacturer reputation (company history, customer service reviews)
- Specific EMF measurements (not just “low EMF” claims)
- Warranty terms and what’s actually covered
- Return policy (restocking fees, return shipping costs)
- Assembly difficulty based on user reviews
- Common failure points mentioned in negative reviews
- Replacement part availability and costs
- Updated model vs. discontinued older version
Compare Top-Rated Portable Infrared Sauna Kits
Step 6: Verify Key Specifications Before Purchase
Before finalizing purchase, confirm these critical details:
Direct manufacturer/seller questions:
- “What is the measured EMF level in milligauss at direct contact with heating panels?”
- “What is your return policy including restocking fees and return shipping costs?”
- “What specific components does the warranty cover and for how long?”
- “Are replacement parts available for purchase? What are typical costs?”
- “Has this model been certified by UL, ETL, or CE? Can you provide certification numbers?”
Documentation to request:
- Complete assembly instructions (review before purchase)
- Detailed specification sheet (not marketing materials)
- Safety testing reports
- Warranty certificate template
Final verification checklist:
- Price confirmed (no hidden shipping/handling fees)
- Delivery timeline acceptable
- All required components included (chair, controller, etc.)
- Return policy clearly understood
- Warranty registration process identified
Step 7: Plan Your Setup Before Arrival
Preparation prevents frustration when your sauna arrives.
Pre-delivery preparation:
1. Verify electrical safety (1-2 days before delivery)
- Confirm outlet is GFCI protected (test button on outlet)
- If not GFCI, schedule electrician or purchase portable GFCI adapter
- Test outlet with high-wattage appliance (hair dryer, space heater)
2. Clear and measure setup location (day before delivery)
- Remove furniture/items from intended location
- Sweep/vacuum floor area thoroughly
- Lay down protective mat if on carpet or delicate flooring
- Confirm measurements still accommodate sauna dimensions
3. Prepare assembly area (day of delivery)
- Clear larger space for unpacking and initial assembly
- Have scissors/box cutter ready for packaging removal
- Prepare phone/tablet for video assembly guides (if available)
- Recruit helper if assembling cabin-style alone
4. Plan first session logistics
Consider timing first session when you can shower immediately after
Have towels designated for sauna use
Fill water bottle for hydration
Clear 60-90 minutes for heat-up and first session
Expert Tips
Experts from Mayo Clinic suggest hydrating pre-session to avoid dehydration. For biohackers, pair with cold plunges for contrast therapy.
Choose carbon over ceramic heaters for even heat; test EMF with a $50 meter. Maintain by wiping interiors; use in ventilated areas.
For chronic pain, aim for 20-30 min sessions 3-5x/week. Budget buyers: SereneLife for trials; upgrade to Clearlight for longevity.
Quick value: Preheat while commuting via app-enabled kits.
Common Mistakes
Skipping EMF checks—leads to health worries; always verify. Overlooking size: Tents seem compact but need assembly space.
Ignoring warranties: Cheap kits fail fast without coverage. Not starting slow: Causes overheating.
Buying without reviews: Forums like Reddit expose flaws. Assuming all infrared equal—full-spectrum beats far-only for versatility.
Example: A user bought a $200 no-name tent, suffered uneven heat, returned for a $600 HigherDOSE.
Takeaway: Consult doctors for conditions like heart issues.

- Premium Wood Construction: Crafted from high-quality natural wood, this indoor dry sauna offers durability, stability, a…
- 1-Person Design: Measuring 35 × 27 × 61 inches, this personal sauna fits easily in apartments, bedrooms, or home gyms—id…
- Low EMF 960W Infrared Heating: Equipped with six carbon infrared panels that deliver fast, even heat throughout the cabi…
- [Fast Heating] — This sauna is equipped with 7 carbon fiber heating panels delivering a total power of 1170W, allowing …
- [FDA-Registered Sauna with Red Light Therapy (660 – 850nm)] — This infrared sauna with red light therapy features a bui…
- [Low EMF Full Spectrum Infrared Sauna (1.4 – 2.6mG)] — Designed as a low EMF infrared sauna, this unit uses 7 high-perf…

- 7-Color Full Spectrum Light for Modern Wellness: Experience enhanced relaxation with a 7-color Full Spectrum RGB light s…
- Fast 20-Minute Heat-Up & Advanced Safety: Get ready to relax in just 20 minutes thanks to efficient 360° 1745W carbon/ce…
- Simple Assembly & Roomy Cabin Design: Enjoy effortless setup with a straightforward modular design—everything arrives in…
What to Avoid
Learn from others’ expensive errors to prevent your own buyer’s remorse.
Mistake #1: Buying Based on Price Alone
The trap: “This $180 sauna has 4.5 stars and claims the same specs as the $800 model. Why pay more?”
The reality: Construction quality, heating consistency, EMF levels, and lifespan vary dramatically. The $180 model often:
- Uses inferior materials that fail within 12-18 months
- Generates high EMF (15-25 mG) not disclosed in marketing
- Reaches only 115-125°F despite claiming 150°F capability
- Lacks proper safety certifications
The smarter approach: Establish minimum performance thresholds first, then find lowest-priced option meeting those standards. Sometimes the $800 model is overpriced. Sometimes the $180 model is falsely marketed. Let specifications and verified reviews guide decisions, not price alone.
Mistake #2: Ignoring EMF Specifications
The trap: “EMF isn’t mentioned in reviews or descriptions, so it must not be important.”
The reality: EMF exposure represents the most significant health consideration for infrared saunas. Manufacturers omitting EMF data typically do so because their units measure high (15-30 mG).
The consequence: Users with EMF sensitivity experience headaches, fatigue, or discomfort. Health-conscious buyers later regret ignoring this specification when researching EMF effects.
The smarter approach: Demand specific EMF measurements before purchase. If unavailable, assume high levels. If EMF matters to you, invest in verified low-EMF models (<3.0 mG) even at premium cost.
Mistake #3: Underestimating Space Requirements
The trap: “It’s only 35 inches square, that’ll fit anywhere.”
The reality: Saunas need more than their footprint
Dimensions:
- Entry/exit clearance (additional 12-18 inches)
- Door swing space (for cabin-style)
- Controller access (remote needs positioning)
- Ventilation airflow (shouldn’t block vents)
The consequence: Unit arrives, doesn’t fit intended location. Setup in second-choice location inconvenient enough that usage frequency drops, turning investment into expensive storage item.
The smarter approach: Measure intended location with additional clearance accounted for. Set up temporary mock footprint using boxes or furniture to visualize real space impact before purchasing.
Mistake #4: Expecting Permanent Installation Quality
The trap: “Portable saunas should perform just like the $8,000 built-in model at my gym.”
The reality: Portable units involve inherent performance trade-offs:
- Less insulation means longer heat-up and higher operating costs
- Smaller heating surface means less uniform temperature
- Assembly connections create potential heat loss points
- Materials optimized for portability, not maximum performance
The consequence: Disappointment with heating performance, temperature stability, or therapeutic effectiveness leads to abandoned use.
The smarter approach: Understand portable infrared sauna kits as “80% solution”—delivering most benefits at fraction of cost but with known limitations. Adjust expectations accordingly or save for permanent installation.
Mistake #5: Skipping Assembly Instructions Review
The trap: “How hard can it be? I’ll figure it out when it arrives.”
The reality: Assembly complexity varies significantly. Some units feature intuitive designs with numbered parts. Others require specific sequencing, careful alignment, and patience. Improper assembly causes:
- Heating panel damage from overtightening
- Door misalignment preventing proper seal
- Electrical connection issues
- Structural instability
The consequence: Hours of frustration, damaged components, unsafe operation, or need for expensive professional assembly service.
The smarter approach: Request assembly instructions before purchase. Read reviews specifically mentioning assembly experience. Watch YouTube assembly videos for actual models if available. Choose units with reputation for straightforward assembly if lacking confidence.
Mistake #6: Neglecting Electrical Safety
The trap: “It’s just a plug-in appliance, any outlet works fine.”
The reality: Some Infrared saunas draw 1,000-2,000 watts continuously. This requires:
- Dedicated circuit or high-capacity shared circuit
- GFCI protection for safety
- Proper gauge extension cord if needed (14-gauge minimum for 15+ feet)
- Stable voltage supply without brownouts
The consequence: Tripped breakers during sessions, fire hazard from improper extension cords, electrical shock risk without GFCI, potential electrical damage to sauna components.
The smarter approach: Verify electrical setup before purchase. Consult electrician if uncertain. Budget $75-200 for proper outlet installation/GFCI addition if needed. Use only manufacturer-recommended extension cords if required.
Mistake #7: Failing to Plan for Moisture Management
The trap: “It’s infrared, not steam. No moisture issues.”
The reality: Some Infrared sauna tents also produce steam along with infrared. Users sweat significantly—releasing moisture into enclosed space. Without proper management:
- Mildew develops on fabric tent interiors
- Wood cabins develop water spots or mold
- Condensation damages nearby furniture or flooring
- Unpleasant odors develop requiring deep cleaning
The consequence: Hygiene issues, shortened lifespan, extra cleaning time, potential health concerns from mold exposure.
The smarter approach: Establish post-session drying protocol from day one. Open unit completely to air dry. Wipe surfaces. Use bathroom (naturally ventilated) or add ventilation to other locations. Consider placement on waterproof mat protecting flooring.
Health Benefits
Far-infrared sauna bathing on recovery from strength and endurance training
A post-exercise infrared sauna session improves recovery
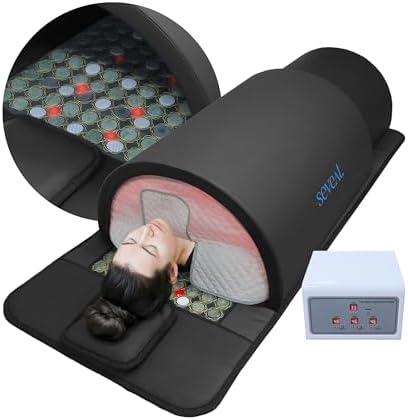
- SAFETY FIRST | Built for calm, confident use at home. Designed with quality materials, controlled heat output, and a low…
- FULL-BODY RESET | Consistent sessions help your body unwind and reset after training or long days. This sauna bag delive…
- XL COMFORT FIT | Extra-large design comfortably fits users up to 6’5″, allowing full-body relaxation without restriction…
- Deep Detox for Sensitive Skin: The EHINI Infrared Sauna Blanket provides an effective detox solution, particularly for s…
- Boost Metabolism and Burn Calories: The far-infrared technology in this sauna blanket boosts metabolism, accelerates cal…
- Enhance Insulation with Infrared Sauna Blanket, Effective Detoxification: Optimize insulation performance through our in…

- Fast Recovery: EHINI Far infrared light penetrates deeply, speeding up muscle recovery and immune system support. The sn…
- Burn Fat While Resting: Boost your body’s thermal energy and circulation with our PU sauna blanket. Burn calories effort…
- Efficient Detox and Relaxation: EHINI PU material infrared sauna blanket helps you sweat out toxins, relax your body and…
Conclusion: Making Your Final Decision
Portable infrared sauna kits transform limited spaces into wellness havens, tackling installation woes with ease. By focusing on EMF safety, heat quality, and your needs, you’ll find a kit like the Sunlighten Solo or budget SereneLife that boosts recovery without complexity. Invest wisely—your body deserves it.
Choosing the right portable infrared sauna kit requires balancing performance specifications, safety features, space constraints, and budget realities.
Your decision framework summary:
- Define your primary use case (recovery, pain management, relaxation, skin health)
- Measure your available space (including clearance and storage)
- Set realistic budget (purchase + operating + maintenance)
- Identify non-negotiable features (EMF levels, temperature capacity, ease of use)
- Research specific models systematically with verification
- Confirm specifications directly before purchasing
- Prepare setup to ensure smooth first experience
The honest reality about portable infrared sauna kits:
These devices provide legitimate therapeutic benefits through accessible, space-efficient designs. They don’t match permanent installation quality but deliver 70-85% of performance at 10-25% of cost.
Success depends on choosing a unit matching your specific priorities rather than pursuing the “best” sauna in abstract terms.
Final recommendations by profile:
Budget-conscious beginners: Mid-tier tent-style balances cost with acceptable quality for testing sauna therapy interest
Space-limited apartment dwellers: Premium tent-style offers best portability-to-performance ratio with compact storage
Performance-focused recovery: Mid-tier cabin-style delivers superior heat coverage for therapeutic protocols
EMF-sensitive health enthusiasts: Premium low-EMF cabin provides verified safe exposure levels
Casual wellness users: Blanket, Tent, Box/Pod, Dome adequate for occasional relaxation sessions
The right portable infrared sauna enhances your wellness routine without dominating your space or budget. Choose thoughtfully using evidence-based criteria, and your investment delivers years of therapeutic benefit.
Other Articles You May Be Interested In Reading:
- Are Portable Infrared Sauna Kits Worthwhile? Pros, Cons, and Key Considerations
- Top 5 Portable Infrared Sauna Kits for Home Use in 2026
- Solstice Portable Infrared Sauna vs Equinox 2-Person Portable Sauna: Which is Better?
- SLISAU35BK Portable Steam Home Spa vs Full Size Portable Infrared Sauna?
- Portable Infrared Sauna Kits (2026): Sun Home Saunas vs. Radiant Health Saunas
- Best Infrared Sauna Blankets: Reviews & Comparison (2026)
- Portable Infrared Sauna for Home: Best Compact & Lightweight Options for Small Spaces (2026)
- Comparing Budget vs. Premium Portable Infrared Sauna Kits: What You Get
- Best Infrared Sauna Blanket for Detox (2026): Top Picks for Home Use
- Best Low EMF Sauna Blanket (2026): Safe Picks That Actually Work
- Sauna Accessories
This buyer’s guide provides educational information for selecting portable infrared sauna kits. Some links are affiliate links, meaning this site may earn commissions on purchases at no additional cost to you. This supports continued independent research and comprehensive buying guides.
Disclaimer: The wellness benefits described are based on general research and user experiences. Individual results may vary. Consult with a healthcare professional before beginning any new wellness routine, especially if you have pre-existing medical conditions, are pregnant, or take medications. Infrared sauna use is not intended to diagnose, treat, cure, or prevent any disease.